Table of Contents
Setting your store hours ensures that customers know when you are available to provide services. This helps manage expectations and can automate your order processing based on your availability.
1. Accessing the Interface #
- Log in to your Vendor Dashboard.
- Locate and click “Settings” in the left-hand menu.
- From the sub-menu, select “Store Hours”.
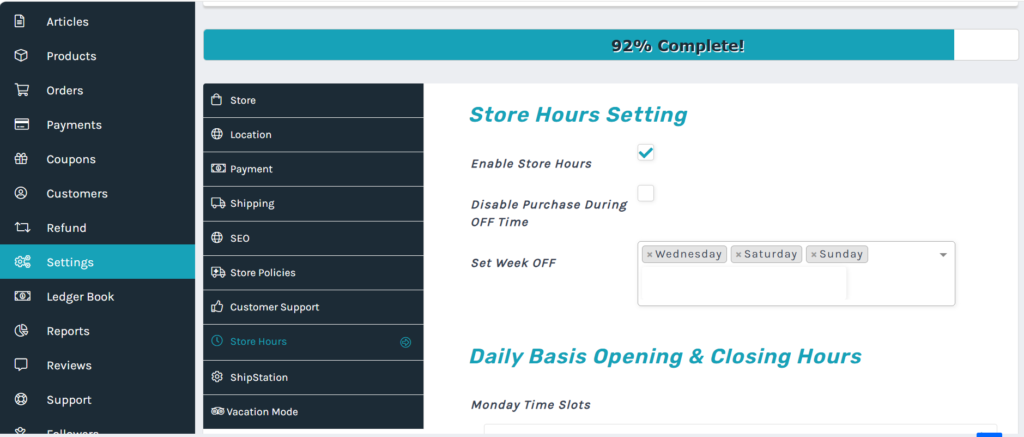
2. Basic Configuration (Store Hours Setting) #
In this section, you can control the overall behavior of your store’s operating hours:
- Enable Store Hours:
- Check this box to activate the feature. Once enabled, your operating hours will be visible on your store’s front page.
- Disable Purchase During OFF Time:
- If checked, customers will be unable to add items to their cart or checkout when your store is “Closed”. This is ideal for businesses that require immediate order processing.
- Set Week OFF:
- Use the dropdown menu to select the days you are closed every week (e.g., Saturday, Sunday). Selected days will automatically be marked as closed for the full day.
3. Setting Daily Basis Opening & Closing Hours #
You can define specific operating periods for each day of the week.
- Time Slots:
- Find the corresponding day (e.g., Monday Time Slots).
- Click the input fields to select your Opening Time and Closing Time.
- Note: If your browser language is set to English, these fields will display in AM/PM format.
- Split Shifts (Multiple Slots):
- If your store closes for a break (e.g., 09:00–12:00 and 14:00–18:00), you can click the “+” icon next to the time slot to add multiple operating periods for a single day.
4. Advanced: Vacation Mode #
If you need to close your store for a specific holiday or an extended period, you should use “Vacation Mode” found in the left-hand menu:
- Click on Vacation Mode.
- Enable the feature and set your specific vacation date range.
- You can customize a message for your customers (e.g., “We are away for the holidays; all orders will be processed next Monday”).
5. Saving Your Changes #
After making any adjustments, scroll to the bottom of the page and click the “Save” button to ensure your new hours are applied immediately.
Troubleshooting Tips:
- Why does my store show as ‘Closed’? Check if the current time falls within your set slots and ensure today is not selected under “Set Week OFF”.
- Changing Time Format: The time format (AM/PM vs. 24h) follows your browser or system language settings. Set your browser to English (United States) to ensure AM/PM is displayed.


